_edited.jpg)
Haphazard Updates
- Alexandra Hutchinson
- Jan 26, 2023
- 4 min read

Updated: Jan 26

First let me start off by saying this post is a mod podge of projects, updates, and a bunch of random things I've been working on.
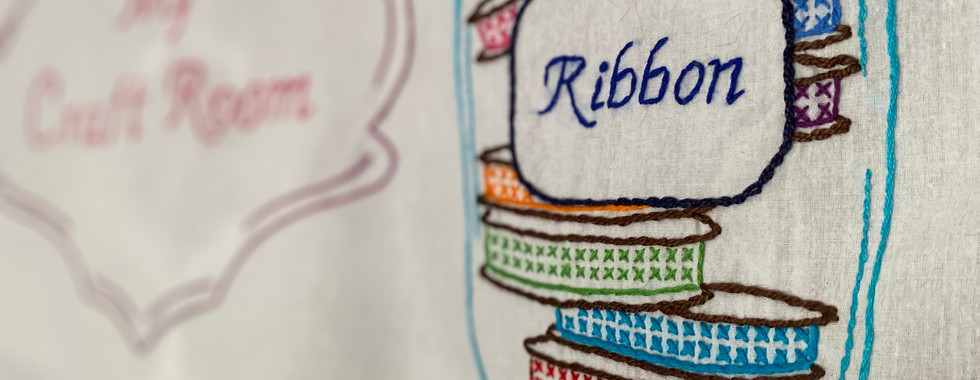
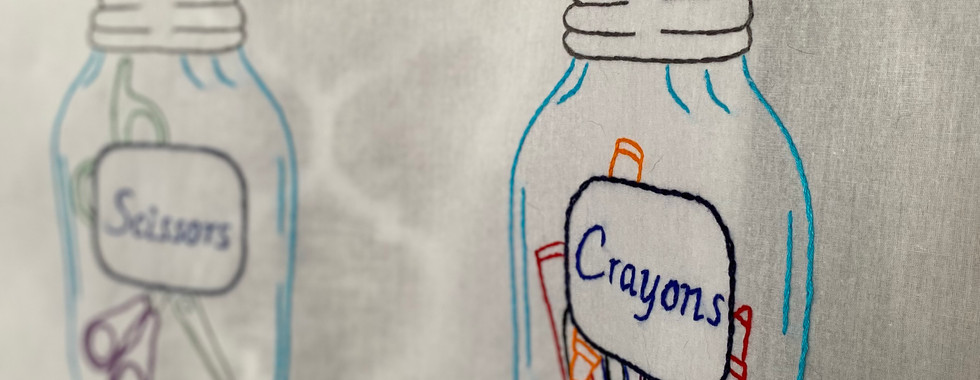
Let's begin with "My Craft Room" wall hanging quilt that if you remember is a hand embroidered project that is 3 foot by 3 foot that I started about two years ago and put it down after doing a small amount and picked it back up recently with the intention to finish it by the end of 2022. Well, I didn't reach that goal but that's okay! I am pleased to announce that I have FINALLY finished the embroidery part! YAY!!
I ordered some fabric from Missouri Star Quilt Company to finish the quilting portion of it and I'm excited to get that in the mail and finish this project for good. Once I get started on the quilting I'll be sure to update you all then! Until now here are some pictures of the embroidery I did on this piece. As another reminder about 98% of the stitching used is a stem stitch and the remaining stitches were cross stitch and French knots. This project comes from Jack Dempsey Needle Art.


As I wait to get the fabric I ordered in I decided to start another project because if we're being honest, are you really a crafter if you don't have a million projects going at the same time? This project was so much fun to start as I'm a lover of puzzles and this was a fabric style of color by number. This project comes from Westfield Laser Design and is a part of their Sewfari line. It is an applique piece where there is fusible material on the back of the pieces and then you would iron them onto your background fabric.

This is what the diagram looks like with fabric already precut and ready to be applied.

Here is a picture of the stencil that you iron onto your background fabric. I chose black with a subtle design due to it helping the colors of the lion pop. Once that is ironed on it's time to start placing the fabric where it belongs! The fabric comes in clumps and you will have to cut the pieces apart which isn't hard at all as they are just little tacks that keep them held together!

Once you have the piece placed where you would like it to be you are going to peel the backing off like a sticker and place the fabric back in the spot and iron just the middle portion of it to tack it into place. You don't want to iron the entire piece as it will fuse to the stencil causing a disaster once you remove the stencil.
Once all the pieces are placed and tacked you will gently remove the stencil. This was a nerve wracking process for me because some of the pieces, no matter how hard I tried ended up being fused to the stencil. However, I was able to get it removed and thankfully any pieces that slightly came off were easy to reapply. After the stencil is removed you will go back in with your iron and press all the pieces to fully adhere them to the background fabric. You will end up with this....


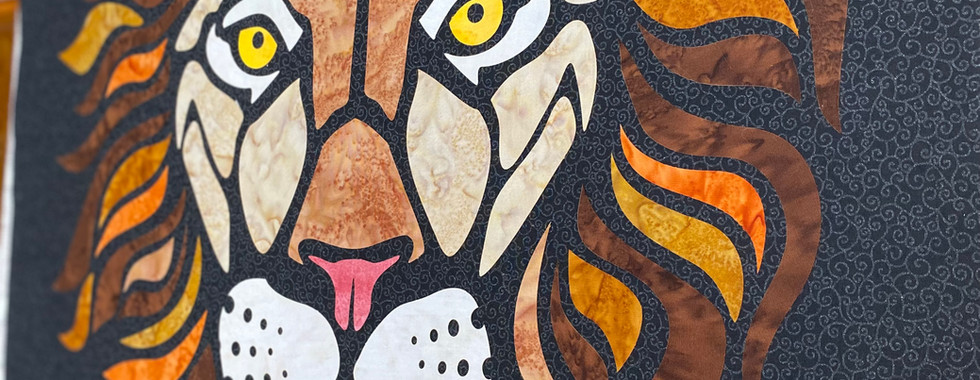
I am in absolute love with how this turned out! The next step is to stitch the pieces on there to give them extra support because I intend to gather the other Sewfari animals and turn it into a quilt.
Ok one last project! I have been working on a commissioned quilt for a client's daughter's high school graduation present. The client gave me a bunch of her daughter's baby clothes to turn into a queen sized quilt. I started by cutting the clothes up to apply stabilizer to the backs of them. Stabilizer is a crucial piece when working with fabric that isn't very stiff, is stretchy, or just needs an extra boost. When doing t-shirt quilts, or in this case baby clothes quilt, each piece will be backed by stabilizer. I chose a medium weight stabilizer for this piece as many of the clothes are thin and flimsy. The client also requested that her daughter's name be added to the quilt and that is what we are going to focus on for this update. I planned the quilt out to where the finished blocks will need to be ten inches squared and there will be 10 blocks across and 11 blocks down. In the middle will be her daughter's name.
I started out by using my Cricut machine to cut cardstock letters as a stencil to use on the fabric. After that I cut my fabric out leaving a quarter inch seam allowance and pinned them to the background fabric. Once that was complete I went in and machine appliqued the letters using a shiny thread to give it more of a dynamic look. Here is what they looked like once finished!


This technique is the same one I will use for my Sewfari animal project as it was so fun to do.
As you can see I have been busy working on a multitude of projects and have kept myself quite busy. With school having started back up that busy level got turned up to eleven! I am excited to announce that it is my last semester and I will be graduating in May with my Bachelors of Science in Business and Management and I will have a minor in Leadership Studies. I cannot wait to see what the future brings!
As always, if you have any questions or want to start a project together, please reach out to me! Until next time....


Comments